
The second strategy of a five-part post about discussion strategies.
These five strategies will help students to improve small-group communication while also allowing them to synthesize important course content in large-group discussions.
It is appropriate and fair to see setting up discussions as one of the most difficult instructional strategies in our lessons. The easiest way to do it is to just pose questions to students. The downfall, as I’m sure many of us have experienced, is that we tend to have frequent high-flyers in the discussion, which lets many others fly under the radar. This post offers the first of four different discussion strategies that can be used to (1) hold students accountable for their learning, (2) improve small group communication and culture, (3) integrate different types of learning styles, and (4) promote student ownership of their learning. This series’s fifth and final post will be about keeping track of the discussion and appropriately evaluating discussions.
The four different types of discussions I will share include: (1) Jigsaw, (2) Fishbowl, (3) Speed Dating, and (4) Affinity Mapping. Beyond explaining each type of discussion, I offer (a) what you (and sometimes students) need to do to prepare, (b) what students need to do as part of the discussion – their engagement with the lesson, and (c) what type of reflection could be used to conclude the discussion.
Affinity Mapping
What is it?
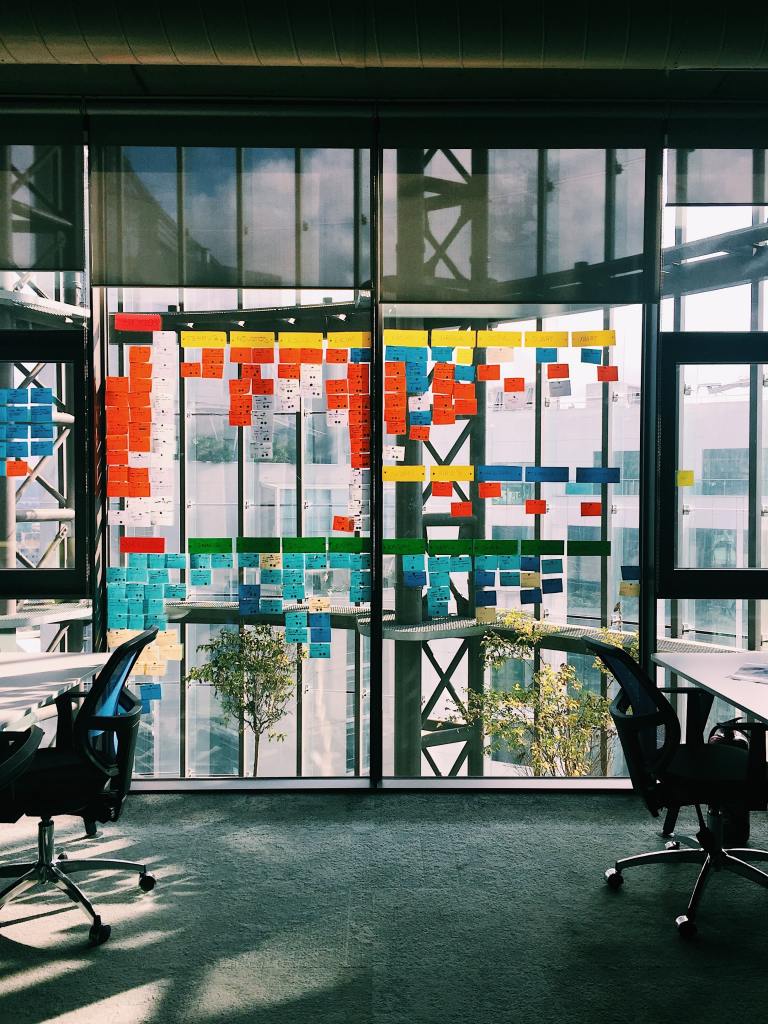
An affinity mapping discussion is a visual way to make sense of big questions and ideas. They are often low-stakes and allow students to review, synthesize, or foster new ideas or connections.
Prepare
Affinity discussions do not require as much preparation mentally on the part of the instructor, but they do require material preparation. Here is what you will need to make sure you have:
- Multiple colors of post-its (or another sticky note)
- OR — if you don’t have post-its, different colored paper or notecards work, but you will also need tape.
Once you have those materials, think about the core question you hope students are attempting to answer. I’ve broken down the different routes the discussion may go depending on the question you’ve prepared below. These will include what you should expect of students to prepare for the discussion as well:
- REVIEW: Using affinity mapping for review is a great way to get students to think about what they learned and what they may still struggle with. This type can be implemented anytime, so you have tremendous flexibility. It also is an opportunity to knowledge-check students to see if any gaps need to be addressed before a summative assessment.
- You: Here, I use three colored post-its (usually pink, yellow, and green if I can). The pink post-its will be for things students are still struggling with or don’t feel they know the content; yellow is for what students feel they grasped but might still need support; and green is for ideas students feel they’ve mastered. If you don’t have different post-it colors, you can designate three spaces on your board for students to tape up responses, thus curating that way.
- Students: Their preparation is pretty minimal. They just need to be able to reflect on what they learned.
- SYNTHESIZE: Using affinity mapping as an opportunity to synthesize will allow students to identify commonalities among multiple texts. This type has less flexibility regarding when you can use it, but it can also serve as a much more robust opportunity to understand how students make more extensive connections among ideas in your course.
- You: Your preparation here is more about considering the question you want to ask and what texts students will utilize. I like to provide a little structure using the different colored post-its by creating different reflections the students would have about the question, or the different post-its can be representative of the different texts. Either works, but you need to prepare accordingly.
- Students: Students need to read and annotate based on the discussion question you will ask. Don’t have them come cold to the discussion without thinking about what they will be asked. If you don’t guide them in the reading process, the affinity mapping will take more time and result in significantly lower cognitive input from the students. It will also result in certain students being more vocal and active (usually the ones who will dominate discussions more regularly).
- NEW KNOWLEDGE: Using affinity mapping to generate new knowledge is a fun way to start a lesson, unit, or course. Giving students the time to think about possibilities is the goal here. You can also use this as an application strategy where students take the information you’ve recently taught them and ask them to apply it in different scenarios or purposes.
- You: If you choose to have students apply knowledge, I would argue this is the most preparation-intensive of the three types. If you ask students to use this as a brainstorm for new knowledge, then you will be doing nothing beyond a question and materials.
- Students: This is the most manageable preparation level for students. They just need to show up and be ready to get creative.
Engage
The day of the jigsaw discussion, depending if you’ve done one previously, will be an exciting one. Students will be able to work diligently with many of their peers while also getting a quick break in the middle of the lesson to move (got to love that kinesthetic approach!). Here is how an affinity mapping would be structured:
- TO START: Introduce the affinity mapping activity. Depending on which approach you take, your directions will be different. Still, you must address (1) the purpose of the activity (be transparent about which type you are using), (2) the use of materials, and (3) timing throughout the discussion.
- QUESTION: Introduce students to the question or prompt they will be focusing their discussion on, and be sure to link the prompt to the purpose of the activity. Build layers of thinking so that students see the direct impact of this activity on their learning. If possible, try and link back to your lesson and course objectives.
- FIRST DRAFT: Students should spend 5 minutes using the materials you provide to respond to your question or prompt. You can do this by putting a timer up, or I like to have a little fun and tell students they have one or two songs on the curated class playlist to get through the brainstorming. Because they are putting information to paper, I call this the first draft stage.
- POSTING UP: Have the students put their post-its/paper on the board, making it visible for all to see. The use of colored post-its makes the visibility even more exciting and can help with student accessibility needs.
- ORGANIZING: Allow students time to find common themes, trends, or ideas among the post-its. You can do this two ways, depending on how comfortable you are with giving students control. It is essential to know that even if you are doing a review, students must organize the three layers of information. It gets them to think about common concerns or celebrations while being far more metacognitive about their experience.
- On Paper: Students can individually map out themes and ideas from what they see using a notebook or tablet. They will then use these when they go to small groups in the next step. Students are asked not to touch anything on the board.
- On Board: Students can collectively move post-its/papers and visually map themes, connections, and ideas. Usually, a leader emerges in this process, and students discuss the ideas as they process. This often ends up skipping the small-group discussions in the next step because the students work together to play out the information.
- DISCUSS: I would like to break this up into two pieces, mainly because the bulk of the discussion time will be here. The first is small groups, and the second, which follows, is a whole group discussion. I try and leverage think-pair-share opportunities as much as possible to help students feel comfortable with their ideas before sharing them with the whole group.
- Small Group: Students are broken up into small groups of 3 to 5 to discuss what they saw on the board, how they responded to it, what they thought about it, and how they arrived at different conclusions. This is also the time for the instructor to monitor the room and stop at individual groups to clarify and process information with them.
- Whole Group: This is the instructor’s opportunity to work through student questions and concerns while encouraging students to draw connections among the group’s responses. I also like to use this time to do one final reorganization of ideas.
Reflect
Take a picture (or pictures) of the board and the affinity groupings. Ask students to choose one and reflect on the experience of constructing the group. I use the following questions to guide that reflection:
- What do you think this group represents?
- How did you approach this grouping? If you didn’t contribute, what do you see in what was created, or what would you have done differently?
- Are there other connections that could still be made? What, why, and how?
- What role do you have in making connections moving forward? How can you apply this strategy to other learning experiences you have?

2 responses to “Keeping up with the conversation: Affinity mapping”
[…] types of discussions I will share include: (1) Jigsaw, (2) Fishbowl, (3) Speed Dating, and (4) Affinity Mapping. Beyond explaining each type of discussion, I offer (a) what you (and sometimes students) need to […]
LikeLike
[…] Like Loading… ← How to elevate connections between students and their terms → Keeping up with the conversation: Affinity mapping […]
LikeLike