My time as a 2022 PhDigital cohort member sparked a desire to learn code to improve the LMS experience for my students. This post is inspired by the learning done in the PhDigital program. This post will guide readers to create the below structure for their LMS. This post is broken up into three parts: (1) content, or the educational philosophy and curriculum planning pieces that are necessary to think about before using the technology; (2) designing the tabs and quick clicks; and (3) understanding how to edit. I provide the code for readers as well. Feel free to copy and paste it into your LMS and edit/adjust it to your needs.

Think of Content
I don’t believe in technology being used for the sake of having technology. Instead, I believe strongly in using instructional technologies to improve learning experiences and outcomes. This means not thinking about technology first but thinking first about the content that technology will support.
For this post, I thought about four chronology-inspired modules of content: objectives, before class, during class, and after class. As a high school teacher, I was trained in the CRISS (Creating Independence through Student-owned Strategies) framework. This framework is built on four core ideas: Prepare (what students need to participate in the lesson), Engage (what students will do within the lesson), Reflect (what students need to do to think about their learning and thinking), and Transform (what students do with what they learn). I use this language in my college classrooms as well. It helps me plan lessons and gives students language to help define their learning journeys.
Let’s return to those modules and plan in this order.
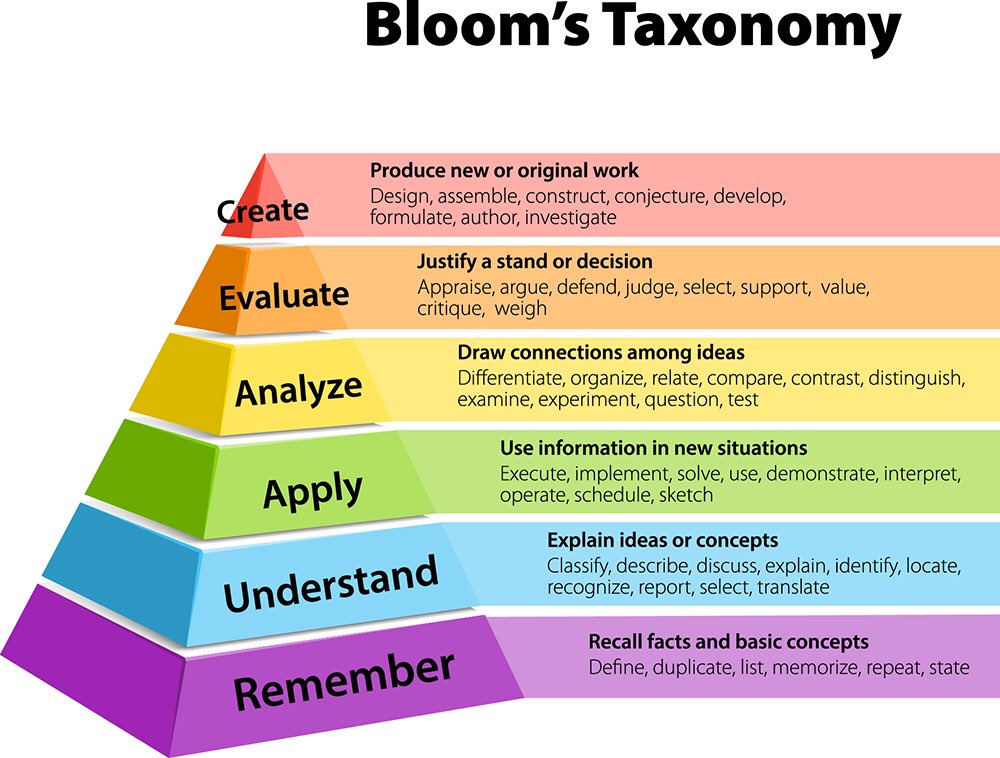
OBJECTIVES (framing the lesson): Objectives guide students’ learning. They also serve as foundations for the lesson you are creating. A good objective includes a verb written using Bloom’s taxonomic language and context for what students will be doing. For example, if an objective is students will define sustainability, then students know from the get-go that they (1) will be defining and (2) will be defining sustainability. Define is considered a lower-order verb when it comes to cognitive thinking. This also means students will not be forced to do something overly tricky. Define-based objectives also imply early learning or scaffolding. See the graphic below for the various levels of learning and associated verbs.
I like to have two to four objectives for each individual class lesson. I write them first to guide what activities and strategies I do at all times of the class.
PREPARE (before class): Here’s where I think about the role of reading. My job is not just to assign readings, especially since there should be a reason for each one. My job is to have readings and to guide students in using them to achieve the lesson objectives. Some like to have readings selected ahead of individual lesson design. Others will prepare a whole semester in advance and have their lessons designed in a way linked more critically to the readings. Either way, you should use the PREPARE function of lesson plans to help guide your students through that assigned practice.
I build out reading questions to guide students to make connections between the readings and the lesson objectives. This helps students read critically and to maximize their time. Too often, students spend more time searching for what they think we want them to get out of the text. Let’s cut that helplessness; it isn’t doing them or us any favors. Give them what they want and need to prepare for class.
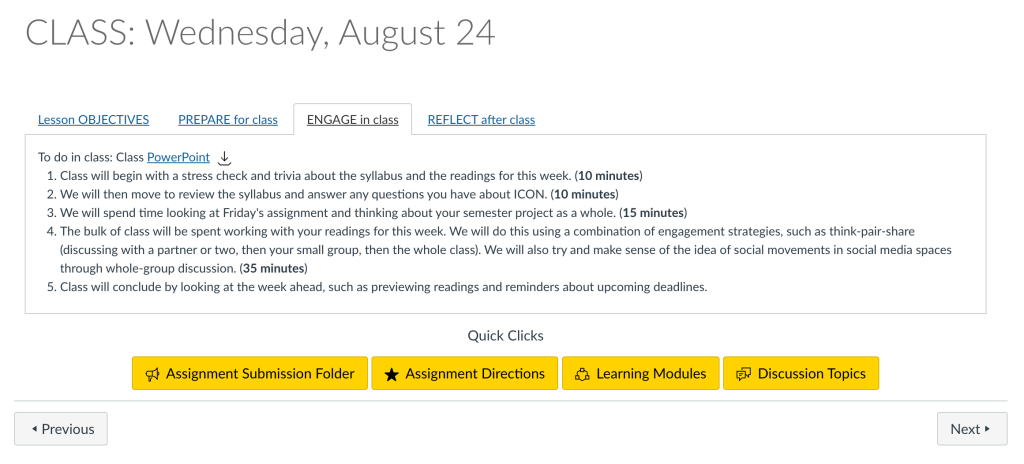
ENGAGE (during class): This is your opportunity to design the lesson based on what students had prepared for and the objectives you wrote. What you do in class should directly respond to and practice the lesson objectives. If you aren’t achieving an objective, then why is it an objective to start with, or what could you do in your lesson that changes your current plans to help students meet the objectives you wrote?
Each of us has our own bag of tricks and strategies we employ during class (if you struggle, or want resources, check out Doug Buehl’s Classroom Strategies for Interactive Learning). But what you choose should provide opportunities for students to work with the information and objectives. Try not to be such a “sage on the stage.” Students need to be able to work with their knowledge rather than you giving it directly to them.
REFLECT / TRANSFORM (after class): Now that students have done something with what you have them prepare for class, we need to see if the practice they had in class with achieving those objectives helped them to be able to reflect and use that information on their own.
I like to utilize the last five to eight minutes of class to give students a glimpse at what is coming in the next lesson. They are then challenged to do one of two things: (1) reflect on what they feel they accomplished in class relative to the objectives or (2) perform a formative (informal) assessment that has them transfer their in-class knowledge. Whatever you choose to do to end and extend your lesson is up to you, but your focus should be on getting students to think about their thinking and apply what they learned.
Turning Content into Interactive Tabs and Buttons
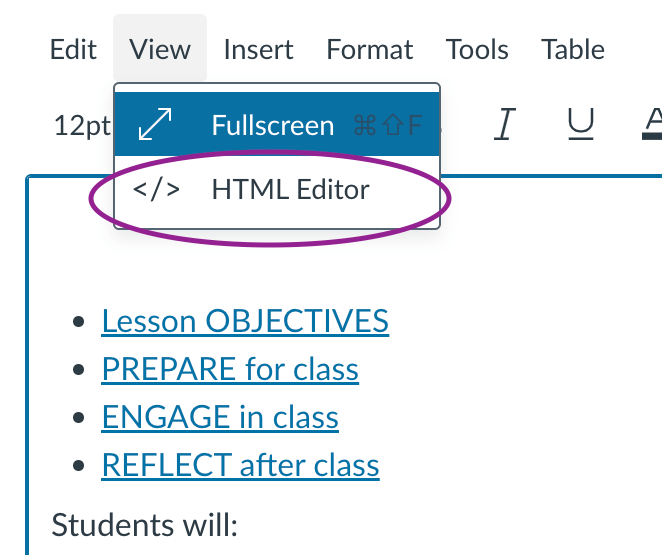
I then take the information I developed with my content planning and build it using HTML code in my LMS system. For me, I use Canvas and the HTML editor within a post. What you see in “Image 2” is the “View” dropdown menu that is located within a new Page. When you first create a page, it will not be in an HTML editor. You need to click “View” and change it to that. When you select “HTML Editor,” the view will shift (Image 3).
This view is where you will copy over the code for the tabs and buttons. Please copy the code at the bottom of this post if you are following along.

The code is written to list the tabs first and then the quick links. What you will edit and change is included in bold in the code.
When you see <ul>, that tells the text to create an unordered list. These will be bullets. You will see these for every tab except the Engage tab. This is because there isn’t a need to list items in numeric order. The time order of the Engage tab means you will see <ol> or an ordered list. If you want to shift anything from a traditional bulleted list to a numeric one, then change the “u” in <ul> and </ul> to “o.” Do the opposite to change from numeric to bulleted.
The information included in the quick links is based on the following image, but you can change those easily. I chose to link the location where students submit an assignment and the assignment instructions so that everything is packaged quickly in one place. The use of Learning Modules brings the students back out to the homepage. The Discussion Topics are where I either allow students to extend the conversation as part of the REFLECT portion of the lesson or where they can link to share other information that helps build classroom culture (like movie recs or promoting events).

Providing students with a one-stop, organized page for daily lessons will increase their ability to perform successfully. It is about removing barriers and hidden curricula often embedded in our course design and LMS functions. It also helps us as teachers to think about our thinking in a way that puts the student experience first rather than our instructional comfort zone.
Code
<p> </p>
<div class="enhanceable_content tabs">
<ul>
<li><a href="#tab-1">Lesson OBJECTIVES</a></li>
<li><a href="#tab-2">PREPARE for class</a></li>
<li><a href="#tab-3">ENGAGE in class</a></li>
<li><a href="#tab-4">REFLECT after class</a></li>
</ul>
<div id="tab-1">Students will:
<ul>
<li><span style="text-decoration: underline;">Verb</span> Objective.</li>
<li><span style="text-decoration: underline;">Verb</span> Objective.</li>
<li><span style="text-decoration: underline;">Verb</span> Objective.</li>
</ul>
</div>
<div id="tab-2">To do before class.
<ul>
<li>Read: Content </li>
<li>Read: Content </li>
<li>Read: Content </li>
</ul>
While reading, be conscientious of what common themes and trends emerge. Use the following questions to help guide your thinking:
<ul>
<li>Guided Reading Question</li>
<li>Guided Reading Question</li>
<li>Guided Reading Question</li>
</ul>
If you are interested in reading more about the topic we are discussing, there are additional readings you can peruse under today's module.
</div>
<div id="tab-3">To do in class:
<ol>
<li>Lesson Activity. (<strong>time</strong>)</li>
<li>Lesson Activity. (<strong>time</strong>)</li>
</ol>
</div>
<div id="tab-4">To do after class.
<ul>
<li>Activity </li>
<li>READ: </li>
</ul>
</div>
</div>
<p style="text-align: center;">Quick Clicks</p>
<p style="text-align: center;"><a class="icon-announcement Button Button--primary" href="ASSIGNMENT SUBMISSION HTTPS LINK" data-api-endpoint="ASSIGNMENT SUBMISSION HTTPS LINK" data-api-returntype="[Folder]"> Assignment Submission Folder</a> <a class="icon-star Button Button--primary" href="ASSIGNMENT INSTRUCTIONS HTTPS LINK" data-api-endpoint="ASSIGNMETN INSTRUCTIONS HTTPS LINK" data-api-returntype="[Assignment]"> Assignment Instructions</a> <a class="icon-module Button Button--primary" href="MODULES HTTPS LINK" data-api-endpoint="MODULES HTTPS LINK AGAIN" data-api-returntype="[Module]"> Learning Modules</a> <a class="icon-discussion Button Button--primary" href="DISCUSSION BOARD HTTPS LINK" data-api-endpoint="DISCUSSION BOARD HTTPS LINK" data-api-returntype="[Discussion]"> Discussion Topics</a></p>
Leave a comment